For the Love of Color

I have an admitted addiction. I know you are assuming it’s to painting, but that’s not it! I am addicted to color! I do appreciate the look of houses that follow a single color pallet or theme, but that design is just not for me. I like to look around and see all sorts of color. It makes me smile! We have mustard yellow walls, light yellow walls, tan walls, purple walls, red walls, terracotta walls, turquoise walls, dark green walls, bright green walls and as Greer likes to call the color he picked for his room “man cave gray” walls. The way we try to tie it all together is by using color in a variety of other ways throughout the house. It’s a kaleidoscope of happy and plans for more happy, I mean color, are underway. I will always be adding color. Many prefer a more monochromatic home because of its relaxing atmosphere, but for me life is just too short not to have color everywhere. Aaron long ago stopped trying to keep me from adding colors and started embracing it (and maybe even liking it) and Greer and Ella Rose love their bright and fun home. My addiction has led to stashes of paint everywhere! Sometimes I just buy a can of spray paint, not because I have a particular item to paint, but because I like the color. Then I will walk around and find random things to paint…true story! I use all kinds of paint and I use it to cover furniture, canvases, barn wood paintings, accessories, floors, rugs, and all sorts of other things. Sometimes this works well and sometimes not so well. Experimentation is part of the fun! I could walk around our home and take hundreds of photos for this post, but I will just select a few and maybe one day do a follow up post with a few hundred more. So, here are some examples of how I have added color by painting random things. I have also included some of my biggest blunders. I thought you might like to see those too! If you are afraid to make a blunder then painting random things may not be for you.

These guys were a little boring!

A little spray paint gave them more personality.

This table used to be very shiny wood…much more deserving of our unconventional farmhouse now!

A little too blah for my taste!

Now it packs a punch of color that is nice in the garden.

I don’t even remember what color this cabinet used to be, but simply painting the trim a fun color instantly added uniqueness.

Barn wood is painted and so is the silver bottle!

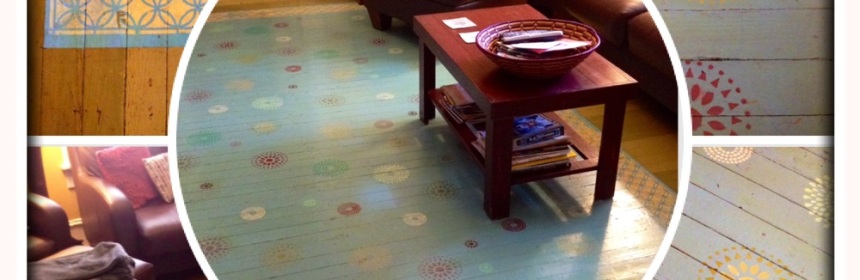
The fireplace looks like tile, but nope, I painted it. The original plan was to tile it when funding allowed, but now we just love it. All those squares were stamped on with make up sponges.

Faded, brown and boring these cushions didn’t make the cut for our new pool porch redo!

So after reading several other bloggers say you could give them a make over with spray paint, I decided a $4 can of spray paint was a bargain cushion redo. (Have you priced these?)

I liked the look! Bright, fun, different! But boy, our booties did not! It was scratchy and miserable and remember this was for a pool!

Thankfully K-Mart clearance saved the day! This is much more comfy! Painting FAIL!

Speaking of those chairs…they were a worn out and faded green color before some spray paint brought them back to life!

This pergola was on the porch of the house my generous sister-in-law bought, but it didn’t fit. So….it was donated to our spruce up our pool porch cause. But, it was black, and I wanted the porch to be injected with personality!

It took over 30 cans of spray paint, many hours of labor, very sore blistery fingers, and maybe some inappropriate language and the black aluminum still showed through! So…I brush painted the final coat and finally got the look I wanted.

If you’d asked me while working on it and even within the two months post finished product I would’ve said epic painting fail…

…but now when I smile anytime I see it, sit in it, or even in this case look at a photo of it I definitely think epic painting win.

Some painting victories are much more small like this old rusted basket I painted to add a punch of color.

Many of you asked about this wreath from our front door post and the truth is it is an old Christmas wreath that the stars rusted badly on and the red berries peeled off of….but a little paint changed it up.

Another random accessory painting. Sometimes color can be subtle.

These chairs used to be black.

The other two became lime green for the vegetable garden.

This was metallic gold when found second hand…I actually painted it black (ha, I know) and sprinkled some grass in and painted again to give it texture.

Another formerly black chair!

This rusted very badly, so it got a coat of paint. It did rust again and get touched up again, and then it rusted again. This time I left it. Many would consider it a painting fail, but I think it’s just unconventional.

Some simple spray painted letters.

They pack some punch to the front door!

Why does most patio furniture come in black?

A little fun with color and some experimentation can go a long way.

That’s better!

This framed piece of tin was beige and plain when we yanked it out of a stash in the back of a run down antique store.

I gave the frame a red wash finish, the tin a yellow wash finish and then took toothpicks and dabbed each dot already pressed into the tin with a variety of colors. Instant happy!

One last view of what happy looks like!
So go ahead, buy some paint, experiment, have fun!

Just don’t paint your feet!
-Kelli
P.S. As I just took a cleaning break while writing I noticed an overwhelming number of things I did not include! Part two will definitely come one day!